In part 3, we finished the setup of our appliance. But if we really want a polished installation we still have a “little” thing to do: replace the self-signed certificates by certificates signed by our internal Certificate Authority.
Let’s be honest: replacing certificates for the vSphere platform has always been a mess (to say the least) ! But thanks to the great work of Michael Webster and Derek Seaman, things got better! First, they produced clear procedures to replace the certificates. Then Derek went a step further and wrote a powershell script that automates the first part of the process (certificate generation).
In parallel, VMware greatly improved its own documentation (… maybe with the support of the two guys above 🙂 ), and even has a tool which can update certificates on some VMware products… But not the vCSA!
Let’s sum it up: we are still waiting for the perfect tool, but in the meantime, there are clear (but lenghty 🙂 ) procedures to update the certificates. And so… Let’s do it!
Prepare the environment
In these first steps we are going to configure our CA to publish appropriate certificate templates, and then configure the tool that will generate the certificates for us.
Create certificate templates
In this guide the certificates are delivered by a Microsoft internal CA. This CA must be configured to delived suitable certificates for the various VMware services. So the first step is to create a certificate template. Let’s connect to our root (or intermediate, depending on your situation) certitificate server. Here we have a Windows 2008 R2 server, but the steps are the same on a 2012 / 2012 R2. For now we mainly follow the steps in the VMware kb, but with some additional tips and tricks 🙂
Start the certificate template management console by running certtmpl.msc. In the list of the available templates, select the Web Server template, right-click and select Duplicate Template.
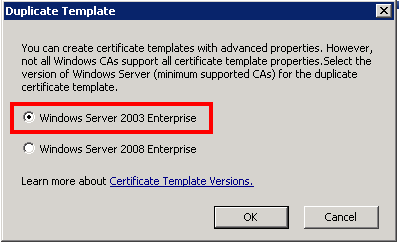
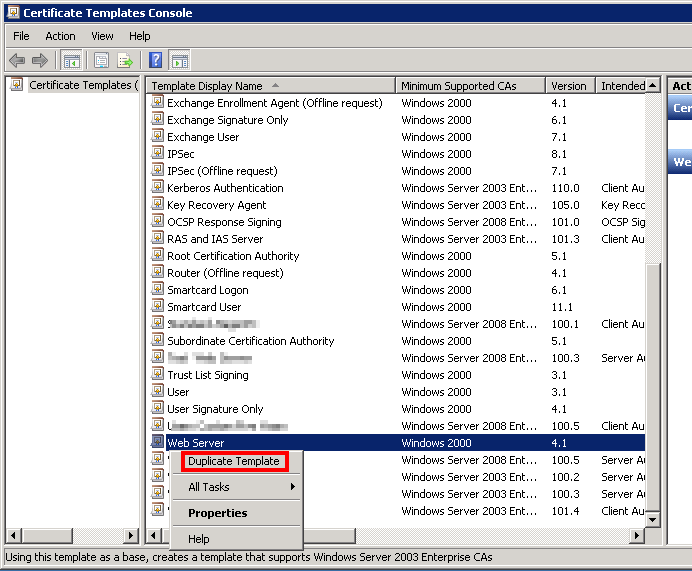 There’s a trap! Leave your certificate template in Windows 2003 mode, or you won’t be able to request certificates from the CA’s web page.
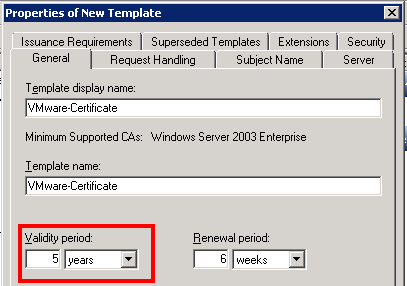
 Let’s configure the new certificate. Name the certificate without spaces (the template name won’t have spaces anyway). I recommend that you also increase the certificate’s validity period; you probably don’t want to restart the whole procedure next year! 🙂
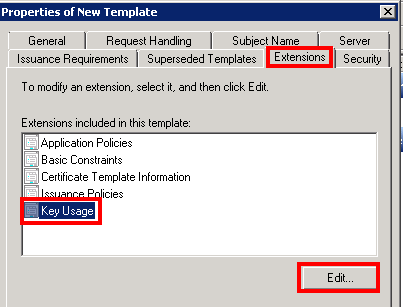
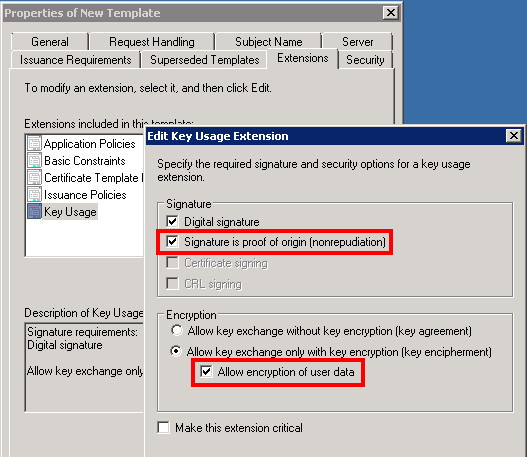
 Now go to the Extensions tab, select Key usage and click Edit…
 Select Signature is proof of origin (nonrepudiation) and Allow encryption of user data. Then click OK.
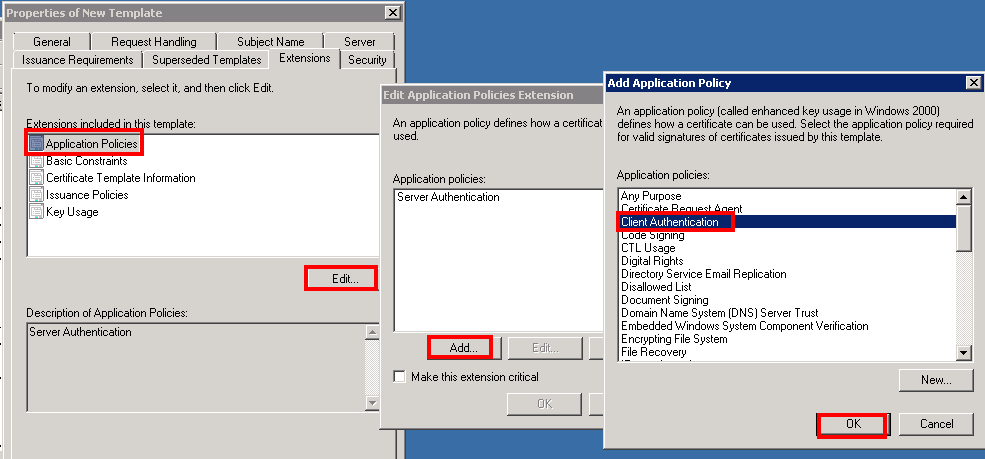
 Now we go to Application Policies, Edit…, and we click on Add…. Finally we add Client authentication.
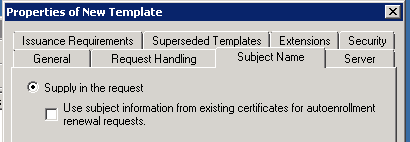
 Quick check: in the Subject Name tab, make sure that Supply in the request is checked!
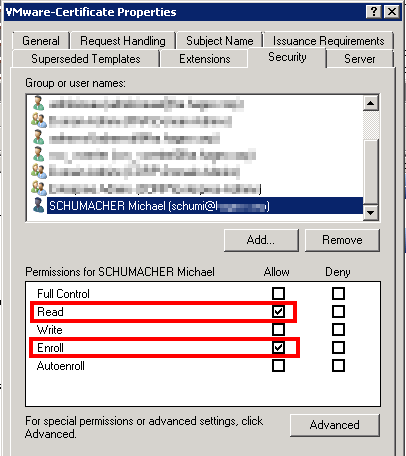
 Finally, go to the Security tab and make sure that the account(s) that you are going to use to request the certificates do have at least the Read and Enroll permissions.
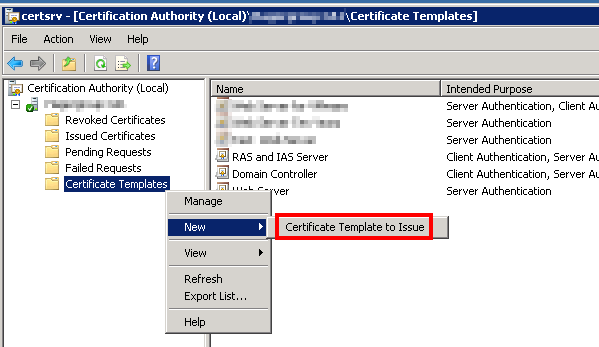
 Click OK to create this new certificate template. We must now publish this new template (it can’t be used as long as it’s not published). Open the Certificate Management console with certsrc.msc (or from the Administration Tools). Develop your CA, then right-click on Certificate Templates, New, Certificate Template to Issue.
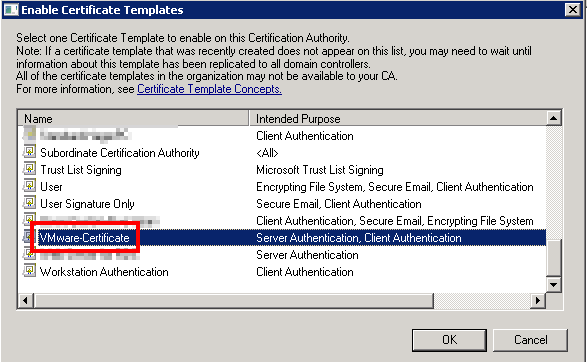
 Select the new certificate template from the list and click OK.
 Your CA is now ready to deliver certificates for the vCSA! (and not only: this certificate template can be used for most (all?) VMware products).
Let’s now configure Derek’s Toolkit script!
Configure the certificate generation tool
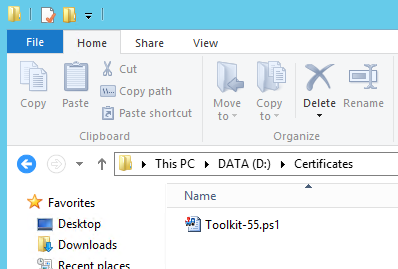
Start by downloading the tool here and save it to a Windows management machine of your choice, in a path like d:\Certificates. I recommend a management server, as it will keep a copy of the certificates. It must have Powershell v3 installed!
 Edit the script with your preferred tool. I recommend Powergui but the default Windows editor (Powershell ISE) will do fine!
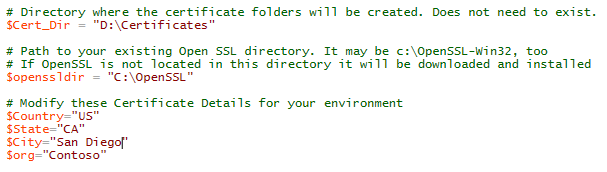 Start by adapting the $Cert_Dir path to your Certificates folder. At best, the OpenSSL folder should not exist yet, so that the tool will download and install the latest version for you. Then, update the location information correctly as it will be used for your certificates.
Let’s now configure our CA.
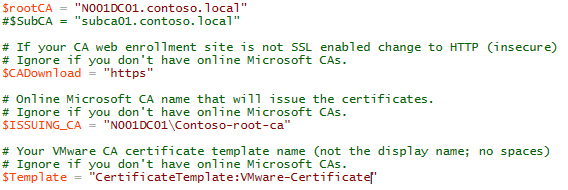 $rootCA and $subCA are your root and intermediate CAs. Provide their FQDN. They must be online and support web enrolment. The websites should use https; if not, change the $CADownload variable to ‘http‘. $ISSUING_CA is going to be the CA’s name of the authority which delivers the certificates, in the form servername\CA_name. You can find it in the Certificate Management console that we have used earlier. Finally, enter the name of your certificate template (not the display name, the certificate name!). Save the script.
Some additional remarks about this certificate configuration part:
- If you just have a root CA, the example above fits well.
- If you have a root and intermediate CA, configure $subCA. $ISSUING_CA will likely be updated to point to the intermediate CA too.
- If you have a root and two (or more) intermediate CAs, no luck. The script does not manage that yet (but you can follow the manual steps here).
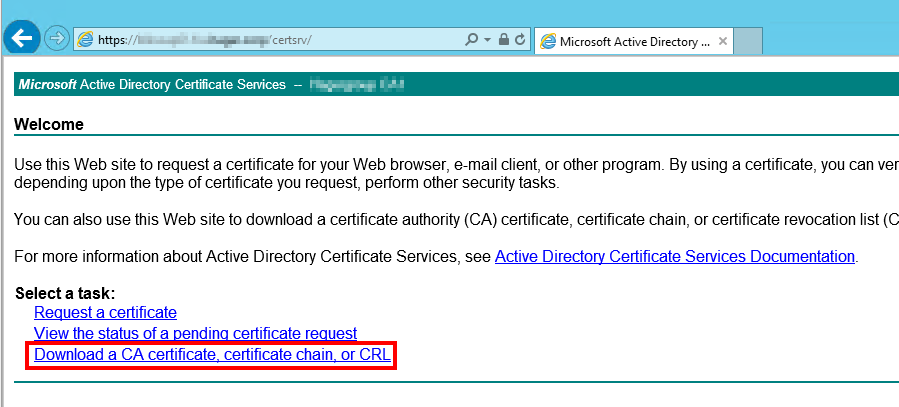
Final step: download the certificate chain from the CA. Go to https://my-ca-server’s-fqdn/certsrv and click Download the certificate chain. (if you can’t access the URL, stop here! You must solve this issue before doing anything else).
 Select Base64 encoding, and Download CA certificate chain.
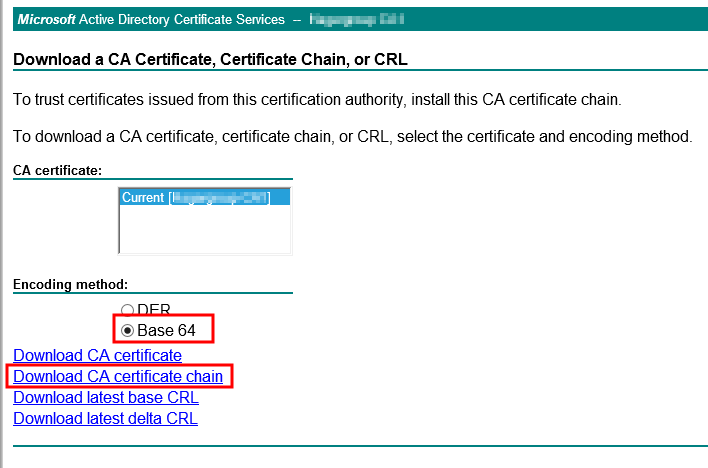 Save this file as cachain.p7b to your d:\Certificates folder. We’re ready!
Generation of the certificates
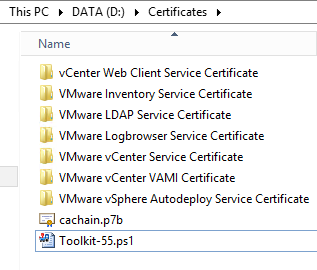
The appliance does not need as many certificates as a Windows instance of vCenter. It needs only (well… “only”, really ?) four certificates.
- One for the vCenter Server service (used also for SSO, web client and VAMI (Virtual Appliance Management Interface).
- One for the vCenter Inventory Service.
- One for the VMware Log Browser.
- One for VMware AutoDeploy (it’s not necessary to take care of AutoDeploy if you don’t plan to use it, but at the same time, it’s not that much more work to do…).
However, the script was initially made with Windows in mind, therefore it will generate more certificates than we really need. We’ll just pick out what we need ! 🙂
OK, let’s launch the Toolkit-55.ps1 script now. It will start by downloading and installing OpenSSL, just let it do the job! If your environment does not allow internet access from your server, download and install OpenSSL manually (from here – you can check the URL from the script). And here we are:
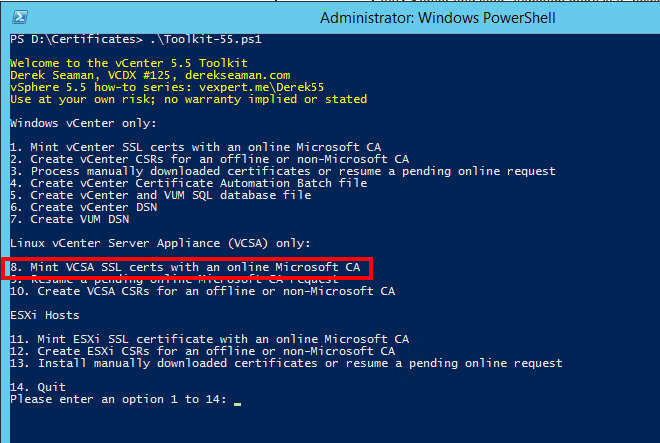 You see that there are several possibilities! For the moment, we are only interested in the choice 8. Type 8 and Enter. The script will now ask for many informations. Be careful!
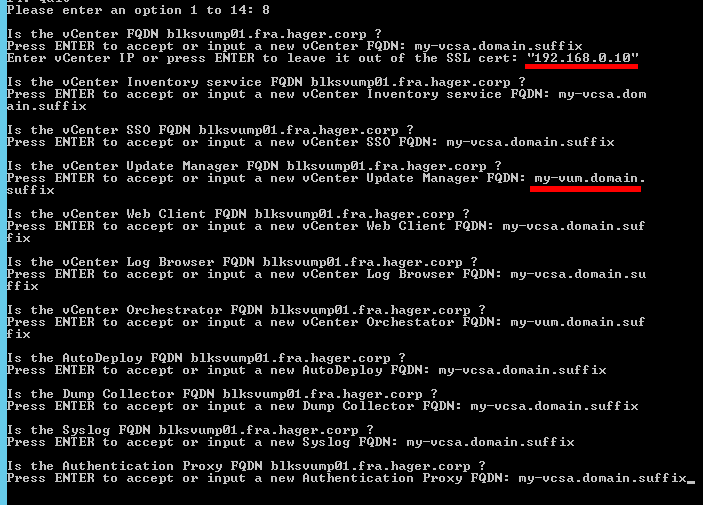 First, the appliance’s FQDN. Do not accept the default, it’s the local machine’s name! Then, the IP address. For some reason, you have to put it within quotes, or it won’t make it to the SAN of the certificate (I guess it’s a script’s bug). And beware also for the VUM certificate (VMware Update Manager): the appliance cannot hold this role, it must be installed on a Windows Server. Just give the name of the future (or existing) VUM server for your environment! Same thing for Orchestrator. All other services can take the appliance’s FQDN.
After that, the script proceeds: it generates private keys and certificate requests, submits the request to the CA and retrieves new certificates. At the end, your d:\Certificates folder should look like this:
 Inside each folder (say, VMware vCenter Service Certificate), you will find your certificate (rui.crt), your private key (rui.key) and some other files. Display it (double-click) to check all the certificate information (Subject with CN, OU, location, Key usage, SAN…). If something is wrong, just remove the folders, correct the error and run the script again!
OK, we now have valid, CA-signed certificates. Let’s install them!
Installation of CA-signed certificates on the appliance
Here we leave Derek and his script and return to the official VMware procedure, at the “Installation and configuration of the certificates for all components” part. We will also do our best to simplify this procedure when possible!
File copy
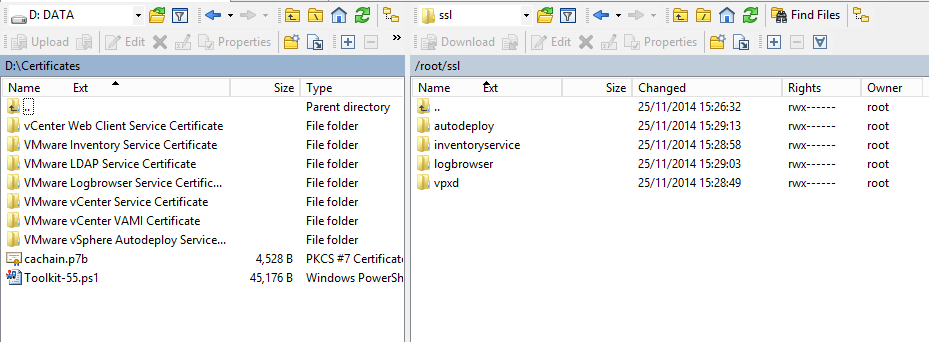
The first step is to copy our certificates to the appliance. From the server hosting the certificates, connect to the vCSA wih WinSCP (root / root-password). Use the SCP protocol. The right pane displays the /root folder on the appliance. Create the following folder structure there:
- ssl
- ssl/vpxd
- ssl/inventoryservice
- ssl/logbrowser
- ssl/autodeploy
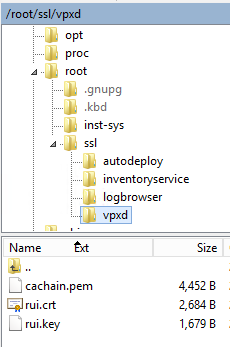
The left pane displays your Windows machine. Move to the folder where your certificates are. You shoul see this:
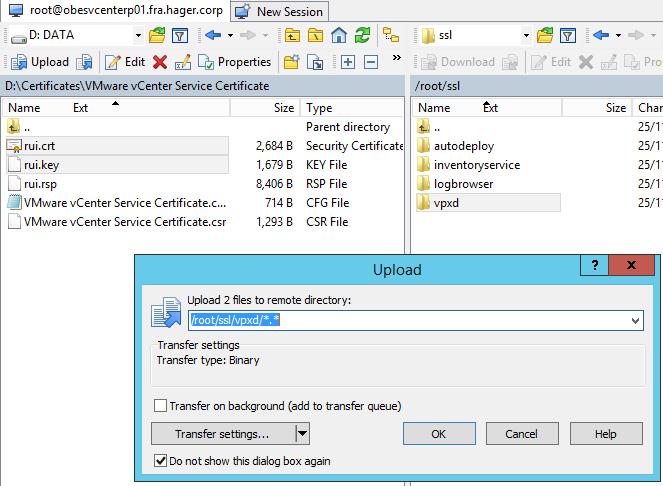
 Enter in the VMware vCenter Service Certificate folder (left) and copy rui.crt and rui.key (certificate et private key) into the vpxd folder (right).
 Same thing for the other folders:
- From VMware Inventory Service Certificate, copy rui.crt and rui.key to inventoryservice.
- From VMware Logbrowser Service Certificate, copy rui.crt and rui.key to logbrowser.
- From VMware vSphere Autodeploy Service Certificate, copy rui.crt et rui.key to autodeploy.
Now go back to your d:\Certificate folder in the left pane, and copy cachain.p7b to the root of the ssl folder.
 Keep the connection open with WinSCP, and connect to the appliance with SSH. Type:
cd ssl
openssl pkcs7 -print_certs -in cachain.p7b -out cachain.pem
This is supposed to create a certificate chain that VMware services understands, but the .pem file contains unnecessary text that we must remove. If you are ok with vi, edit cachain.pem and remove everything before —–BEGIN CERTIFICATE—- and after —–END CERTIFICATE—–. At the end of the cleanup, the file should look like this:
-----BEGIN CERTIFICATE-----
Intermediate CA certificate thumbprint
-----END CERTIFICATE-----
-----BEGIN CERTIFICATE-----
Root CA certificate thumbprint
-----END CERTIFICATE-----
Obviously, if you have a single level CA, the file will look like:
-----BEGIN CERTIFICATE-----
Root CA certificate thumbprint
-----END CERTIFICATE-----
If you’re not into vi, download the cachain.pem file with WinSCP and edit the file in Windows, but use a text editor that understands unix/linux line breaks (tip: the Windows Notepad does not work; try Notepad++). When the file is clean, send it back to the appliance with WinSCP.
Finally, when your cachain.pem is ready, copy it to the inventoryservice, logbrowser and vpxd folders (Autodeploy does not need it). Use WinSCP to copy the file, or with the command line:
cd
cp ssl/cachain.pem ssl/inventoryservice
cp ssl/cachain.pem ssl/logbrowser
cp ssl/cachain.pem ssl/vpxd
Your folder structure should now look like this:
 The logbrowser and inventoryservice folders should have the same content. The autodeploy folder too, but without the cachain.pem file.
We are finally ready to install the new certificates… And now is a very good time to make a snapshot of the appliance!
vCenter Services configuration
When the snapshot is done, stop the services:
service vmware-stsd stop
service vmware-vpxd stop
Create a new certificate including our custom certificate and the CA chain certificate.
cd ssl/vpxd
cat rui.crt cachain.pem > chain.pem
We can now use this certificate to replace the integrated, self-signed certificate.
/usr/sbin/vpxd_servicecfg certificate change chain.pem rui.key
Wait a little bit… The result should be: VC_CFG_RESULT = 0.
If that’s the case, congratulations! You’ve replaced the first certificate! If not, take note of the exit code and have a look here to help you.
Restart the vmware-stsd service:
service vmware-stsd start
Next !
Inventory Service configuration
We will first unregister the inventory service:
cd /etc/vmware-sso/register-hooks.d
./02-inventoryservice --mode uninstall --ls-server https://ma-vcsa.mon-domaine.corp:7444/lookupservice/sdk
You should spot a Return code is: Success message, then the inventory service will stop. Like we did before, we first create a new .pem certificate.
cd /root/ssl/inventoryservice
cat rui.crt cachain.pem > chain.pem
Nice, but the .pem certificate is not good enough; we want a .pfx file:
openssl pkcs12 -export -out rui.pfx -in chain.pem -inkey rui.key -name rui -passout pass:testpassword
Don’t try to be smart and change the password. “testpassword” is all the appliance wants! Now copy the files to the inventory service ssl folder.
cp rui.key /usr/lib/vmware-vpx/inventoryservice/ssl
cp rui.crt /usr/lib/vmware-vpx/inventoryservice/ssl
cp rui.pfx /usr/lib/vmware-vpx/inventoryservice/ssl
Change the permissions.
cd /usr/lib/vmware-vpx/inventoryservice/ssl/
chmod 400 rui.key rui.pfx
chmod 644 rui.crt
Register the inventory service back (you will need the password of administrator@vsphere.local).
cd /etc/vmware-sso/register-hooks.d
./02-inventoryservice --mode install --ls-server https://ma-vcsa.mon-domaine.corp:7444/lookupservice/sdk --user administrator@vsphere.local --password mdp-administrator@vsphere.local
If everything goes well, you will see a Return code is: Success again and the service will restart. But we still need to associate the inventory service to the vCenter service again.
rm /var/vmware/vpxd/inventoryservice_registered
service vmware-inventoryservice stop
service vmware-vpxd stop
service vmware-inventoryservice start
service vmware-vpxd start
Check for Return code is: Success in the output.
Inventory service: done. Next!
Log Browser configuration
The steps are exactly the same as for the Inventory Service. Unregister the service.
cd /etc/vmware-sso/register-hooks.d
./09-vmware-logbrowser --mode uninstall --ls-server https://ma-vcsa.mon-domaine.corp:7444/lookupservice/sdk
Create the certificate.
cd /root/ssl/logbrowser
cat rui.crt cachain.pem > chain.pem
PFX conversion.
openssl pkcs12 -export -in chain.pem -inkey rui.key -name rui -passout pass:testpassword -out rui.pfx
File copy.
cp rui.key /usr/lib/vmware-logbrowser/conf
cp rui.crt /usr/lib/vmware-logbrowser/conf
cp rui.pfx /usr/lib/vmware-logbrowser/conf
Permissions update.
cd /usr/lib/vmware-logbrowser/conf
chmod 400 rui.key rui.pfx
chmod 644 rui.crt
Service registration. Check forReturn code is: Success !
cd /etc/vmware-sso/register-hooks.d
./09-vmware-logbrowser --mode install --ls-server https://ma-vcsa.mon-domaine.corp:7444/lookupservice/sdk --user administrator@vsphere.local --password mdp-administrator@vsphere.local
Service restart.
service vmware-logbrowser stop
service vmware-logbrowser start
Log Browser, done! The three mandatory services are now configured. If you’re really tired of these certificates (and you’re sure that you won’t use Autodeploy), you can stop here and restart the appliance. But if you went through all these steps, it would be a bit sad to stop here, don’t you think? Come on, let’s do a last one!
Autodeploy configuration
The procedure is slightly different, but easier. Basically, it’s a file copy and a rename operation.
cd /root
cp ssl/autodeploy/rui.crt /etc/vmware-rbd/ssl/waiter.crt
cp ssl/autodeploy/rui.key /etc/vmware-rbd/ssl/waiter.key
Then we change the permissions and owner.
cd /etc/vmware-rbd/ssl/
chmod 644 waiter.crt
chmod 400 waiter.key
chown deploy:deploy waiter.crt waiter.key
And we register the service again. There could be an error with the rm command if you haven’t started Autodeploy yet; you can safely ignore it.
service vmware-rbd-watchdog stop
rm /var/vmware/vpxd/autodeploy_registered
service vmware-vpxd restart
Wait for the usual Return code is: Success, and you’re done! All the services of the appliance are now registered with your custom, CA-signed certificates.
We will now reboot the appliance to apply the changes (could it be a Windows system, after all?).
shutdown -r now
Summary
While the appliance is restarting, take a few minutes to enjoy! It was not really that complicated, but many admins are afraid by the length of the procedure. But hey, if you took the time to deploy an internal CA, you should use it! (and if not…well, you should probably think about it 🙂 ).
In any case, now that you have deployed your CA-signed certificates, you can also enjoy the warning-free interface:
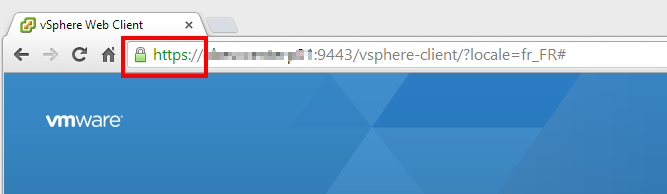 This is how it should look like! And if it suddenly goes orange or red again, then you know that the security of your vCenter has been compromised, which is the main point, after all!
This last article closes our vCSA article series, and our appliance is now ready for production. Of course, there are still some things to do: prepare a Windows machine for Update Manager and the management tools (especially PowerCli), and… add some hosts to our vCenter! And of course, we will deploy CA-signed certificates to these hosts, but that’s a story for next time!